Overview Tab
The overview tab contains the employer details. You can view and edit the employer details from this tab. You can see them in Figure 1 provided below. The employer details are divided into the following sections:
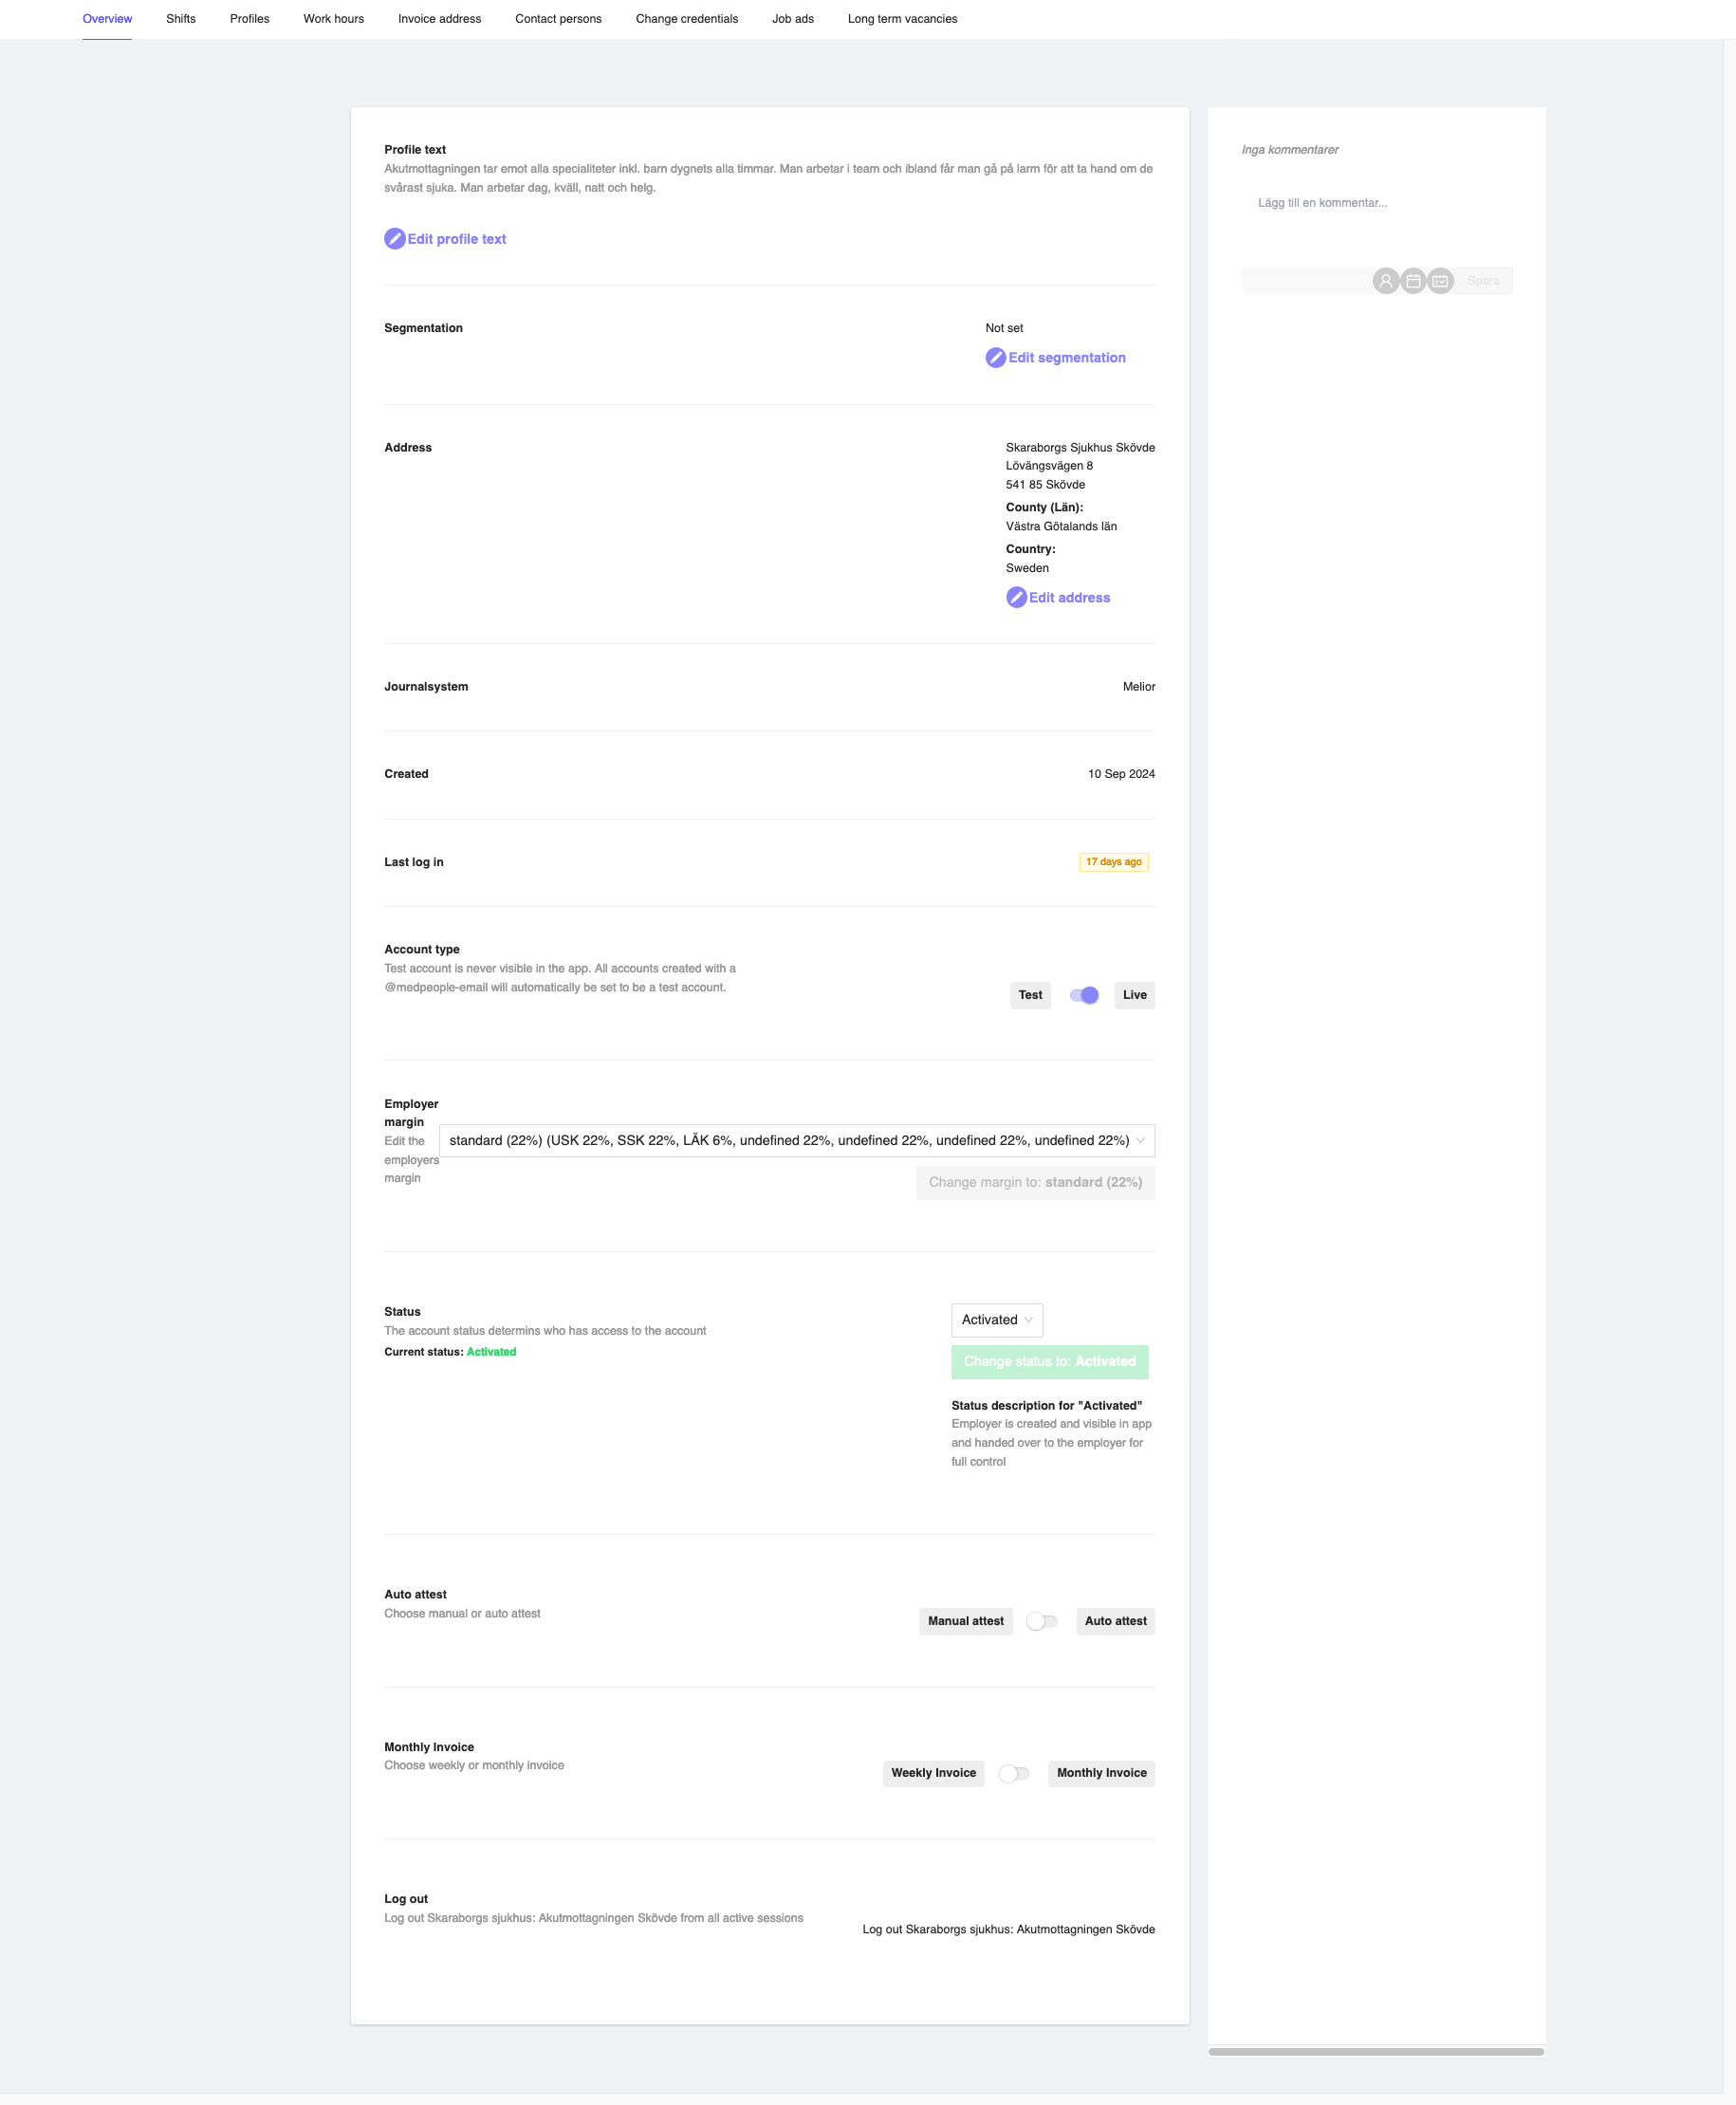
Figure 1: View Employer Details Page
- Profile text: The profile text of the employer. You can add a profile text for the employer.
- Segmentation: The segmentation of the employer. The segmentation is added based on the differentiation of the employer. This is a distinction added based on growth hack and experiences. You can choose the required segmentations from the modal by clicking the
Editbutton.
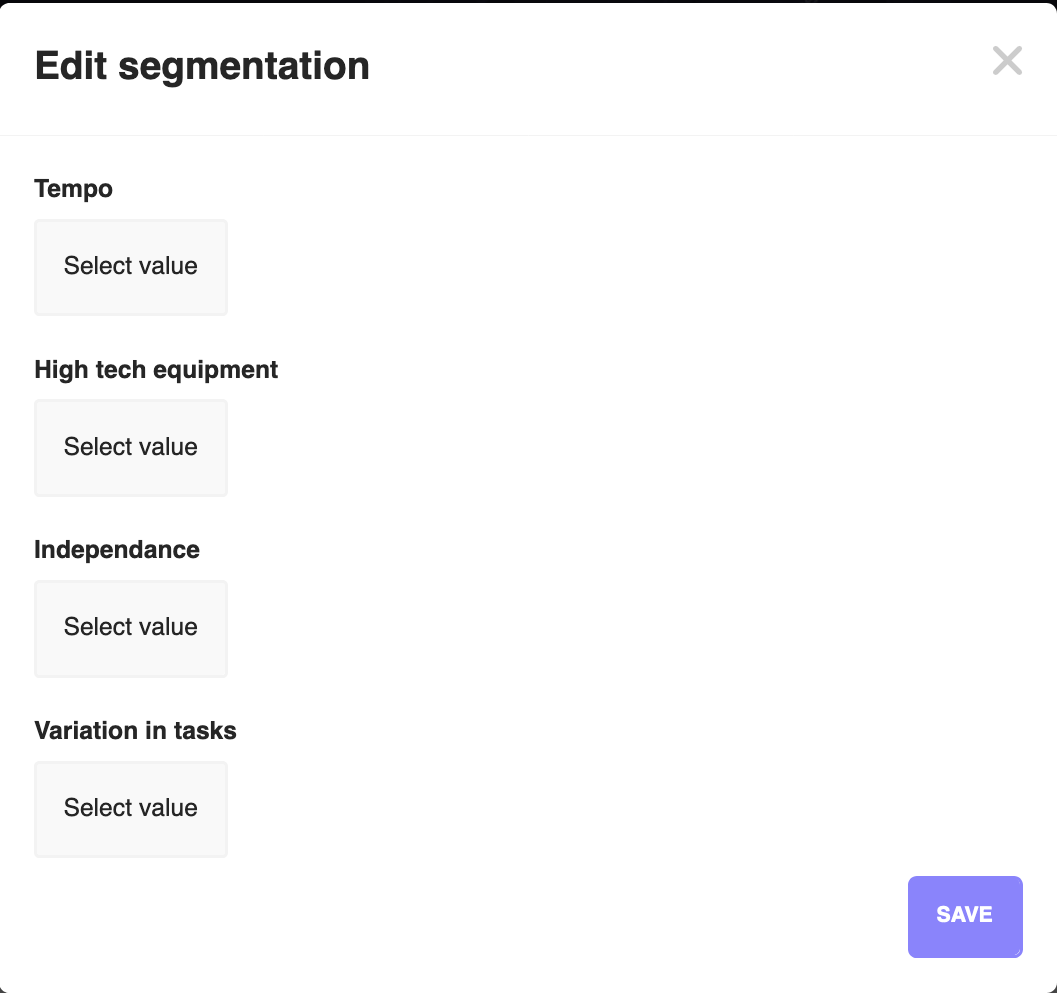
The available segmentations are:
- Tempo
- High tech equipment
- Independence
- Variation in tasks
You can choose a value range from 1 to 6 for each of the segmentations from the dropdown list. Once you choose the required segmentations, click on the Save button to save the segmentations. If you want to cancel the operation, click on the X button on the top right corner.
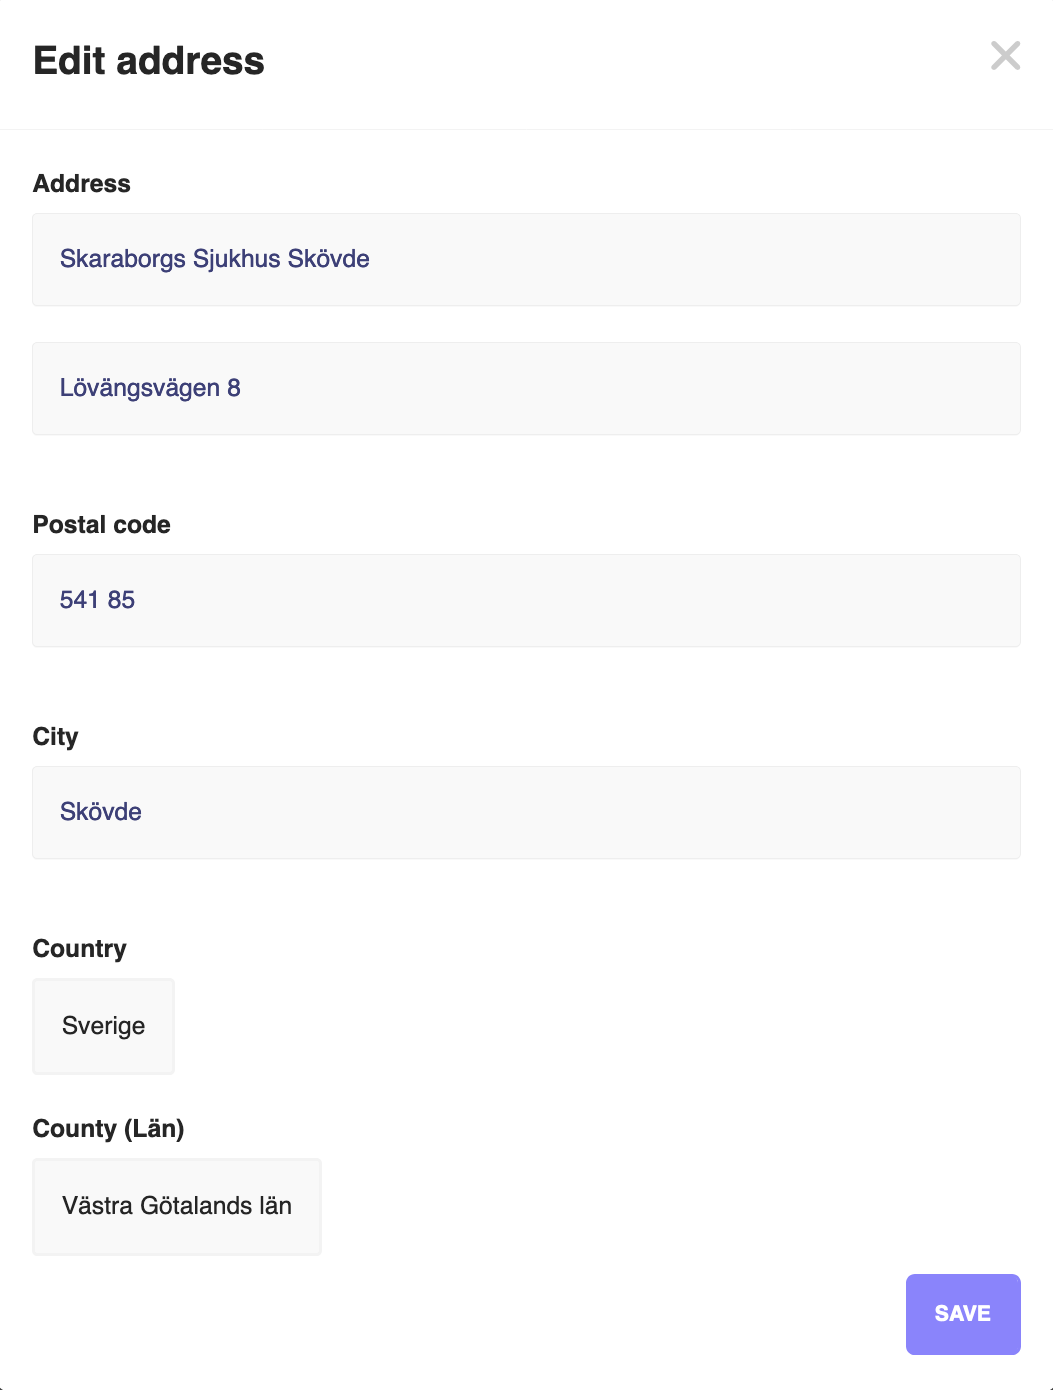
- Address: The address of the employer. You can view or edit the address of the employer as required and save the changes. Once you make the changes, click on the
Savebutton to save the changes. If you want to cancel the operation, click on theXbutton on the top right corner.
-
Journalsystem: The journalsystem of the employer, which is the same as the
EMR systemin the create employer page. You can only view the journalsystem of the employer. -
Created: The created date of the employer. You can only view the created date of the employer.
-
Last login: The last login date of the employer. You can only view the last login date of the employer. This is useful to know when the employer last logged in to the employer application.
-
Account type: The account type of the employer. There are two options:
-
Test: Used if you want to create a test employer account. This won't be visible in the mobile applications for the consultants.
-
Live: Used if you want to create a live employer account. This will be visible in the mobile applications for the consultants.
Account typeIf you create an account using the Medpeople email address (i.e., the email address ending with
@medpeople.se), then the account type will beTestby default. If you create an account using any other email address, then the account type will beLive.
-
-
Employer margin: The employer margin, which is used for the amount Medpeople will be taking from the employer. You can only view or edit the margin as required. However, it is recommended to keep the margin as it is unless you have a specific requirement to change it.
-
Status: The status of the employer account. There are six options available for setting the employer account:
-
Pending: By default, the employer account will be in pending status. This is used if the employer account is not yet approved by the admin user.
-
Activated: Used for changing the status of the employer account to activated. This is used if the employer account is approved by the admin user. Once activated, the employer account will be visible in the mobile applications for the consultants, and the employer will be able to use the employer account.
-
Removed: Used for changing the status of the employer account to removed. This is used if the employer account is removed by the admin user. Once removed, the employer account won't be visible in the mobile applications for the consultants, and the employer won't be able to use the employer account.
-
Banned: Used for changing the status of the employer account to banned. This is used if the employer account is banned by the admin user. Once banned, the employer account won't be visible in the mobile applications for the consultants, and the employer won't be able to use the employer account.
-
Visible: Used for changing the status of the employer account to visible. This is used if the employer account is visible by the admin user. Once visible, the employer account will be visible in the mobile applications for the consultants, but the employer won't be able to use the employer account.
-
Hidden: Used for changing the status of the employer account to hidden. This is used if the employer account is hidden by the admin user. Once hidden, the employer account won't be visible in the mobile applications for the consultants.
These statuses, once set, need to be saved by clicking on the Change state to:<status> button.
Once you make the change, it will be reflected in the Current status field, on the left side beneath the Status field.
-
Auto attest: The auto attest status of the consultant's shift. You can choose the auto attest status from the dropdown list. You have the following options to choose from:
-
Manual attest: Used if the employer wants to manually attest the consultant's shift. Or the admin user wants to manually attest the consultant's shift.
-
Auto attest: Used if the employer wants to auto attest the consultant's shift. In this case, once the consultant completes the shift and marks the shift as completed, the shift will be auto attested by the system. No manual intervention is required to attest the shift. Not recommended always.
-
Monthly invoice: This option ensures which type of invoicing the employer wants to have. You can choose the monthly invoice status from the dropdown list. You have the following options to choose from:
-
Weekly Invoice: Used if the employer wants to receive the weekly invoice.
-
Monthly Invoice: Used if the employer wants to receive the monthly invoice.
-
Log out: The log out button is used for logging out the employer account from any logged-in sessions on the employer applications. This is useful in certain cases where the employer doesn't have access to the employer account and wants to log out from all the sessions.
Log outBefore you click the Log out button, make sure that the employer is aware of this action. Once you click the Log out button, the employer account will be logged out from all the sessions, and the employer won't be able to access the employer account until they log in again. This means the employer should have their username and password ready to log in again. If the employer doesn't have the username and password, they won't be able to log in to the employer account.